
|
|
This is my first attempt at a clothes tutorial, so feedback is welcome. As I'm not much good with the dodge and burn technique, this tutorial involves pixel shading. Any paint program can be used really, although if your program has layers then you may find it useful to put the under-top and sari on seperate layers.
Base used in this tutorial is by Unauthorized Kisses.
1. The important thing to understand when drawing any garment is how it's put together. The basic sari is created using one long piece of fabric, worn over an underskirt and top. To better understand how the sari is put together, visit here. This website is in Dutch, but the pictures clearly illustrate several types of sari and how they are put together. In this tut I'll show you how to draw the most basic and commonly seen type of sari.
First of all, outline the under-top, like so:
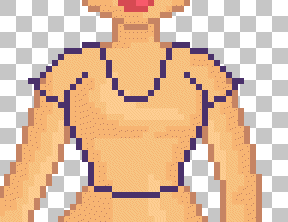
I'm not going to shade the top until later, as not all of it is going to be visible. For the sake of easy visibility, I'm going to draw the top in a different colour to the rest of the sari.
2. Now draw in the shape of the bottom of the sari. This should be floor length and slightly full at the bottom, as shown. The waist line drawn in here is mainly for reference; it will be covered later.
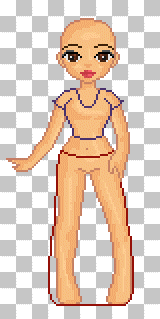
Again no shading yet, as it's best to wait until the whole outline is constructed otherwise you may end up shading areas that are hidden later.
3. Now draw in the final section of the sari, the section of cloth that is draped over the shoulder. First, go over a small section of the outline of the undertop at the shoulder, like so:
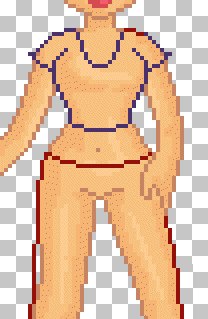
Then, go over the outline of the base on the opposite side, from the waist up to a point just under the armpit. Connect this point to the nearest side of the shoulder mark, so it looks like this:
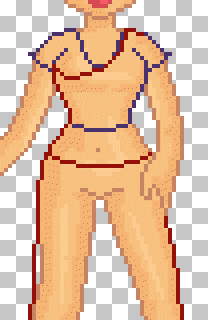
Now, from the outside of the shoulder mark, draw a long, sweeping line down to a point half way down the thigh. Make sure that the waist line is no longer visible (i.e. it is under the draped section) and delete it. The finished section should look like this:
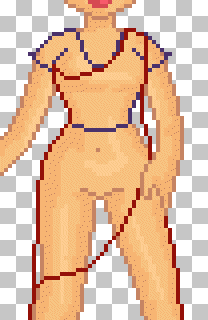
4. Shading time, WOOOOOOO!!! This is where a pallete comes in handy. Here's my pallete:

The second colour is the outline colour. Six shades normally works with most doll sizes, however if you're doll is particularly large it may be worthwile using more.
To start with, erase any part of the under-top's outline that will be under the sari. I'm going to start by shading the 'draped' section first. Here, you need to create the impression of folds in the fabric that would result from the fabric being draped in such a way. This means that the folds need to run in the direction that the fabric has been draped, i.e., from hip to shoulder. To do this, using the second shade in your pallete (there is a reason for this, you'll see why later), draw in long, thin shadows pointing from hip to shoulder, following the curve of the fabric, like so:
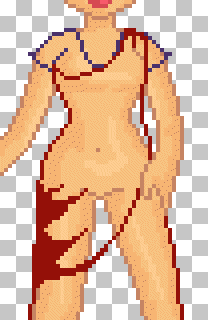
These lines represent the creases between the folds. Also, be sure to shade slightly around the outline, particularly around the waist, so that the fabric looks like it's wrapped around the doll and not floating eerily in front of it x_X
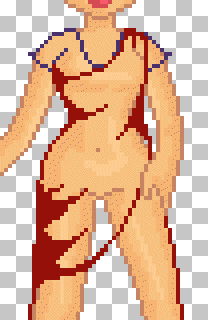
5. Now, using the next shade up, it's time to start shading the folds. Follow along the 'crease' lines drawn in the last step, making the shading thicker at the bottom of the fold than it is at the top. Also, add a few pixels onto the ends of the 'crease' lines, as this will create the illusion of the creases becoming shallower. Again, you should also shade slightly around the outline. Repeat this step with the next shade up, and then fill in any empty spaces with the fifth shade in your pallette.
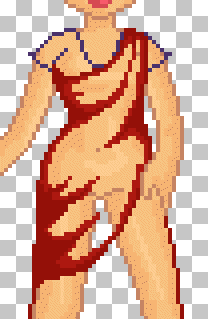
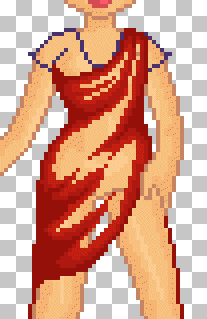
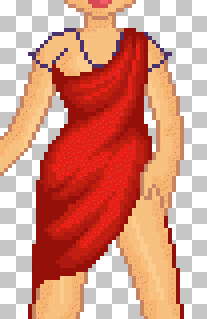
6. Now it's time to add highlights. Using the lightest shade in your pallette, add highlights to the folds by drawing a few, thin lines in the direction of the folds. I find that this looks more realistic if you put the highlights closer to the top of the fold, and if you don't highlight smaller creases.
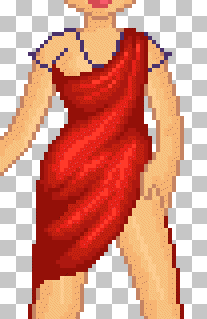
7. To add more depth to the creases and folds of the fabric, take the darkest colour in your pallete (this is why I skipped it earlier) and add extra shadows in the very corners of this section of the sari and the darkest parts of the creases.
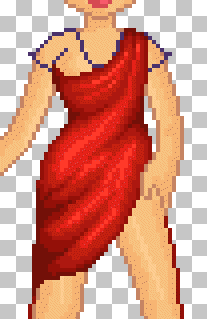
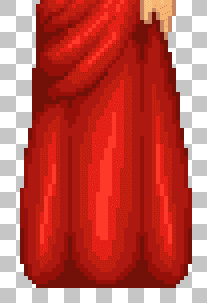
8. Now it's time to shade the skirt section of the sari. Using the second shade in your pallette, shade under the bottom line of the draped section of the sari and around the outline slightly. Be sure to make the shading thickest under the draped section of the sari. Also, draw a few slightly curved triangle-like shapes and vertical lines from the bottom of the skit, following the curve of the outline, like so:
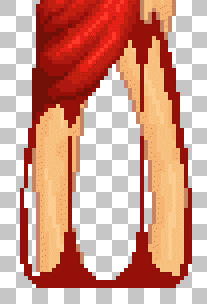
These are the starts of more creases and folds in the skirt section. I find it's best not to go overboard with these: too many creases and the skirt section will end up looking frilly and odd.
9. Using using the third shade, fill in all the gaps. Now, taking the next lighter shade in your pallete, it's time to start adding some light. Add some light to the parts of the folds that would 'stick out', making sure to leave a gap between these light sections and the initial creases drawn, so that some of the fill colour shows through. Repeat this step with the next shade up aswell.
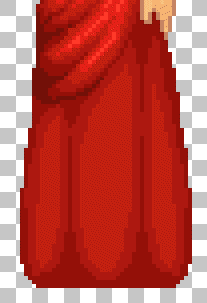
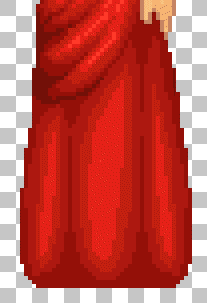
10. Also, using the lightest colour in your pallete, add some highlights by adding a few pixels where the light would catch the sari most. This will differ depending on the size and pose of the doll, but as a rough reference, my highlights look like this:
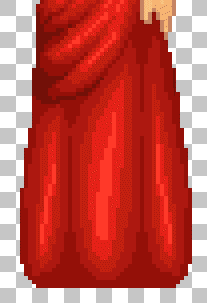
Finally, using the first colour in your pallette, add some deeper shadows where the creases will be deepest (usually towards the bottom) and under the bottom edge of the draped section of the sari, a bit like this:
11. Now it's time to shade the under-top! I outlined this in a different colour earlier for visibility, but i'm going to keep the top that colour for the sake of variety - after all, purple and red always did look nice together :)
Pallette time!! I'm only using five colours, but again, a larger doll would probably need a greater variety of shades so that the shading looks more realistic.

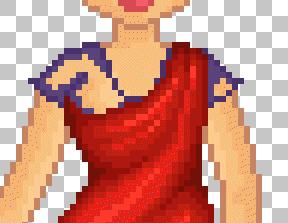
Using the next colour up from the outline colour, shade slightly around the bottom edge and anywhere that shadow would be present, for example, on top of the shoulder (because of the shadow cast by the head) and around the curve of the breast (due to shape). Mine looks like this:
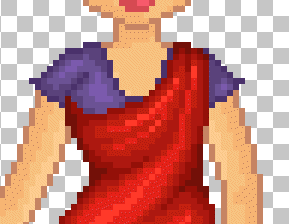
12. Fill in the rest of the top with the next colour up, and then taking the fourth colour draw in where the top would catch the light. On mine this is on the shoulders and the breast. finally, using the lightest shade, add some highlights.
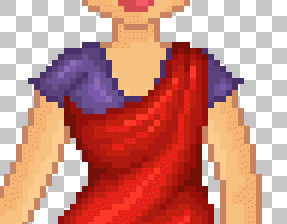
And now your basic sari is complete!! Just add hair and details, and you have yourself a nice, exotic doll.

Well there you go, that was my first ever clothes tutorial, I hope you find it useful (or at least entertaining - I really can't explain things very well!!) if you have any feedback please email me. I'd love to see any dolls made using this tutorial :)